

This is the old thread posted on Painting under the engine bay. I had to venture to another focus forum because the person who posted it that long while ago doesnt post here anymore (or probably didnt check in on the sticky)
----------------------
User: focus40
Thought I'd include a short write up along with the pics. Feel free to leave any questions or comments.
Items needed:
1) masking tape
2) sandpaper (300,350,400 are all fine)
3) dishsoap or paint surface prep (depending on how dirty the pieces are)
4) 8mm socket if you want to remove the cam cover
5) primer/spray paint (1 can of each did my entire project..I used duplicolor metalcast, adhesion promoter, and ground coat)
6) lamin-x or other clear cover if you want to protect your finished paint job
7) rubber gloves
Teh instructions:
1) Start by removing all parts that you want to paint. For this project I painted the svt coolant cover, batter cover, fuse box cover, windshield fluid cover, passenger engine mount cover, tranny fluid dipstick, coolant cap, strut tower covers and cam cover (for easy removal of the cam cover, first remove the coolant tank and power steering resevoir to access the four bolts holding it on, then heat it up with a hair dryer to ensure it doesn't crack while taking it out)
2) Clean the parts with either the dishsoap or if your like me and have a dirty engine bay..the paint surface prep worked wonders on the grease and dirt buildup. Use rubber gloves if you'd rather not have surface prep all over you. After you finish removing all the grime give the pieces a quick rinse with clean water.
3) After the parts are clean lightly rough them up with the sandpaper. Your just looking to give the paint a better surface to hold to so you don't have to spend to long. Just a couple wax on..wax off strokes on the entire surface to be painted.
4) Rinse the part again to remove any sanding residue and dry the parts thoroughly before proceeding. At this point you want to have as little physical contact with the parts as possible or you'll transfer the oils from your hands to the plastic and the paint won't adhere as well. Rubber gloves work well for not touching the pieces.
![Image]()
surface prepping the pieces
![Image]()
parts are dry, sanded down, and ready to be masked off
5) Now that the parts are dry go ahead and mask off any areas you don't want to get paint on. I masked off the inside's of all the covers like the coolant cover etc and the inside fuse box cover so I could keep the diagram intact.
![Image]()
battery cover masked off and ready for paint
6) Your now ready to paint..set up a well ventilated area you can work in and spread out some newspaper so you don't get spray paint everywhere. Word to the wise..the metal flake in the ground coat will go everywhere...luckily it wipes off easily. Work in an area with low dust if possible..so it doesn't land on the parts while you paint. I used the duplicolor metalcast spray paint but any high temp paint should work fine..all depends what color and look your going for. Just be aware that since it's plastic you do need to use some kind of plastic primer so the paint will adhere.
![Image]()
products used in this project
7) Start by applying the duplicolor adhesion promotor. I used two coats and allowed 5-10 minutes in between coats. You just want a nice even coverage of the entire piece so that the ground coat will adhere to the plastic. If your worried about your spray painting technique practice on something else first so you can get familiar with it. Try to keep your hands off any painted areas as this can cause the paint to run or smear.
8) Wait 10 minutes after you apply the adhesion promoter coats and your now ready to apply the ground coat. The ground coat contains the metal flake and gives the metal like background to the paint. I went three coats with this and made sure it had a deep shine before applying the paint. My first coat of this was a little thicker than normal so I could get good coverage of the entire piece. You wait 10 minutes in between coats and 30-60 minutes after you apply the last coat before applying the paint.
![Image]()
this is after the final ground coat was applied..let it sit and dry for an hour before you use the paint
9) For the paint I applied two coats with some final touch up work to get even coverage. The metal flake is very apparent in direct sun and the final touch up should be done in direct sun so you can really see how the paint looks. My garage light just didn't cut it. After your happy with the finished product walk away and let the pieces dry. I brought them inside overnight and let them dry in a warm room.
![Image]()
pieces after final paint is applied
![Image]()
you can see the difference in the sun..the metal flake from the ground coat really catches the light
10) Now that the paint is done and dry your ready to put them back in your car. This is a good time to clean the engine bay if you haven't already (simple green and rags works wonders). The paint should be dry to the touch and you should be able to handle the parts easily without gloves. Try not to scratch up anything as you put it back in .
If you painted the cam cover use that hair dryer again and think about putting a notch in the bottom of it to make it easier to get back in.
![Image]()
notch taken out of the cam cover for easy install
11) Optional step: applying lamin-x or other clear cover onto the painted parts. I chose to do this on my battery cover and fuse box because I constantly take off my battery cover and knew I would scratch the paint. It's easier to put them lamin-x on after the paint is dry but before you install the parts again. Simply cut out a piece slightly larger than the part and apply. Then cut away the excess with a razor blade and your done. The paint still shines through and now it's protected.
![Image]()
battery cover with clear cover applied and cut to fit
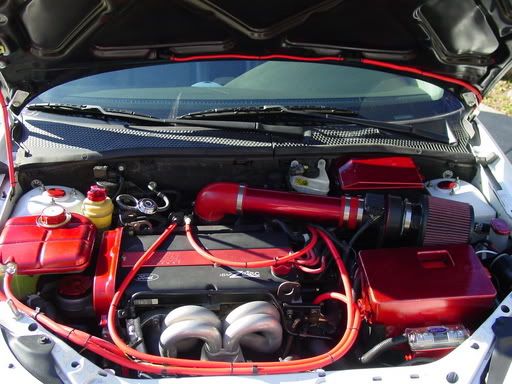
12) Sit back and enjoy your newly painted engine bay
![Image]()
-----------
~Lorne
----------------------
User: focus40
Thought I'd include a short write up along with the pics. Feel free to leave any questions or comments.
Items needed:
1) masking tape
2) sandpaper (300,350,400 are all fine)
3) dishsoap or paint surface prep (depending on how dirty the pieces are)
4) 8mm socket if you want to remove the cam cover
5) primer/spray paint (1 can of each did my entire project..I used duplicolor metalcast, adhesion promoter, and ground coat)
6) lamin-x or other clear cover if you want to protect your finished paint job
7) rubber gloves
Teh instructions:
1) Start by removing all parts that you want to paint. For this project I painted the svt coolant cover, batter cover, fuse box cover, windshield fluid cover, passenger engine mount cover, tranny fluid dipstick, coolant cap, strut tower covers and cam cover (for easy removal of the cam cover, first remove the coolant tank and power steering resevoir to access the four bolts holding it on, then heat it up with a hair dryer to ensure it doesn't crack while taking it out)
2) Clean the parts with either the dishsoap or if your like me and have a dirty engine bay..the paint surface prep worked wonders on the grease and dirt buildup. Use rubber gloves if you'd rather not have surface prep all over you. After you finish removing all the grime give the pieces a quick rinse with clean water.
3) After the parts are clean lightly rough them up with the sandpaper. Your just looking to give the paint a better surface to hold to so you don't have to spend to long. Just a couple wax on..wax off strokes on the entire surface to be painted.
4) Rinse the part again to remove any sanding residue and dry the parts thoroughly before proceeding. At this point you want to have as little physical contact with the parts as possible or you'll transfer the oils from your hands to the plastic and the paint won't adhere as well. Rubber gloves work well for not touching the pieces.

surface prepping the pieces
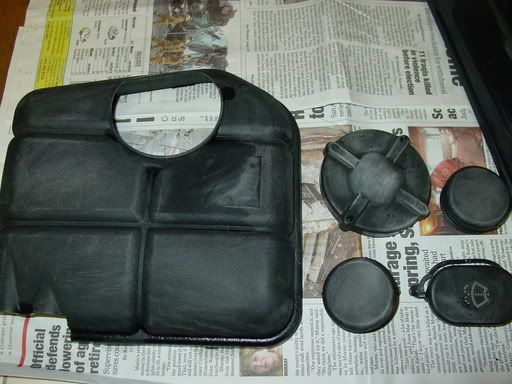
parts are dry, sanded down, and ready to be masked off
5) Now that the parts are dry go ahead and mask off any areas you don't want to get paint on. I masked off the inside's of all the covers like the coolant cover etc and the inside fuse box cover so I could keep the diagram intact.

battery cover masked off and ready for paint
6) Your now ready to paint..set up a well ventilated area you can work in and spread out some newspaper so you don't get spray paint everywhere. Word to the wise..the metal flake in the ground coat will go everywhere...luckily it wipes off easily. Work in an area with low dust if possible..so it doesn't land on the parts while you paint. I used the duplicolor metalcast spray paint but any high temp paint should work fine..all depends what color and look your going for. Just be aware that since it's plastic you do need to use some kind of plastic primer so the paint will adhere.
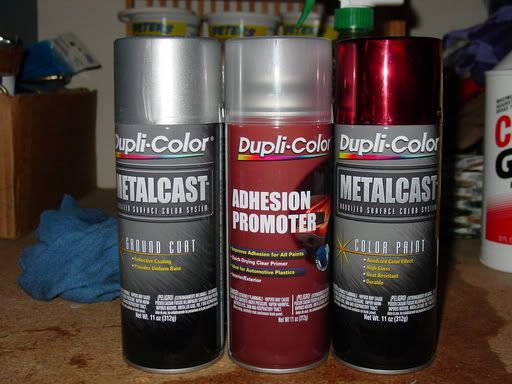
products used in this project
7) Start by applying the duplicolor adhesion promotor. I used two coats and allowed 5-10 minutes in between coats. You just want a nice even coverage of the entire piece so that the ground coat will adhere to the plastic. If your worried about your spray painting technique practice on something else first so you can get familiar with it. Try to keep your hands off any painted areas as this can cause the paint to run or smear.
8) Wait 10 minutes after you apply the adhesion promoter coats and your now ready to apply the ground coat. The ground coat contains the metal flake and gives the metal like background to the paint. I went three coats with this and made sure it had a deep shine before applying the paint. My first coat of this was a little thicker than normal so I could get good coverage of the entire piece. You wait 10 minutes in between coats and 30-60 minutes after you apply the last coat before applying the paint.

this is after the final ground coat was applied..let it sit and dry for an hour before you use the paint
9) For the paint I applied two coats with some final touch up work to get even coverage. The metal flake is very apparent in direct sun and the final touch up should be done in direct sun so you can really see how the paint looks. My garage light just didn't cut it. After your happy with the finished product walk away and let the pieces dry. I brought them inside overnight and let them dry in a warm room.

pieces after final paint is applied

you can see the difference in the sun..the metal flake from the ground coat really catches the light
10) Now that the paint is done and dry your ready to put them back in your car. This is a good time to clean the engine bay if you haven't already (simple green and rags works wonders). The paint should be dry to the touch and you should be able to handle the parts easily without gloves. Try not to scratch up anything as you put it back in .
If you painted the cam cover use that hair dryer again and think about putting a notch in the bottom of it to make it easier to get back in.

notch taken out of the cam cover for easy install
11) Optional step: applying lamin-x or other clear cover onto the painted parts. I chose to do this on my battery cover and fuse box because I constantly take off my battery cover and knew I would scratch the paint. It's easier to put them lamin-x on after the paint is dry but before you install the parts again. Simply cut out a piece slightly larger than the part and apply. Then cut away the excess with a razor blade and your done. The paint still shines through and now it's protected.

battery cover with clear cover applied and cut to fit
12) Sit back and enjoy your newly painted engine bay
-----------
~Lorne
")