

Not sure if anyone else would ever want to do this, but i figured i would do a quick write up on it just in case.
I picked up an air horn from someone on craigslist for $10 the other day, and decided to try and install it. My stock horn was removed some time ago, so I figured it would be better than nothing! You can normally find these types of air horns for $20-$50+, just depends on how loud you want.
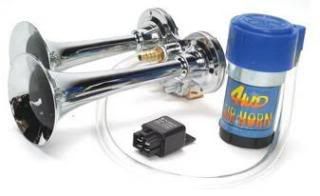
Here are the materials needed for this installation:
-Air Horn kit. a good place to go is harbor freight tools, autozone, checker, etc..JC whitney is also a good place.
![Image]()
-30 amp or higher inline fuse holder
![Image]()
-i used two of these "Quiksnap" connectors, because you can retain the stock horn connector in case you ever want to go back the stock setup
![Image]()
-Zip Ties. The more the merrier!
![Image]()
-2 female spade connectors
![Image]()
-2 horn mounting brackets. one should be on the stock horn, one can be had at auto parts stores, junk yards, etc. you can always fab one as well.
![Image]()
-Hardware: I needed two nut/bolt pairs one for horn to bracket, one for bracket to frame.. its always good to have a couple of extras and some washers, etc..
![Image]()
ok, so to start off with, you will want to assemble your cables. For the power (red+) cable, assemble it in this order:
Spade conn=inline fuse holder w/30A fuse=wire (14g is good)
Negative cable (black -)
Spade=wire (14g)
Now you want both of these to be around 3 feet total in length so you have plenty of slack to reach the horn connector.
You will also want about 3 feet of hose (i used 5/16 ID clear plastic hose purchased @ lowes, but usually the horn kit will have some with it).
So now that you have everything purchased that you will need, we can start the installation. This will be much easier if you have the car up on jackstands or on a lift. *NEVER* leave the car jacked up and crawl under it without jackstands!
1. Unplug and remove the stock horn unit, and remove the mounting bracket.
2. Next, shape the horn mounting bracket as needed to accomodate the larger air horn. You will need to find somewhere to mout the horn under the car. You can see where I mounted mine HERE:
![Image]()
This is the view from underneath the drivers side of the vehicle. The horns trumpets point forwards towards the lower grill, beside the radiator/condenser.
3. Now that you have the horn mounted, its time to mount the compressor. I mounted mine using an extra horn bracket that i had. It is mounted high in the engine compartment, near the battery. This way its up away from splashes and debris. I used the upper headlight screw to attach the bracket to.
![Image]()
![Image]()
4.Next you will connect the two wires to the corresponding connectors on the bottom of the compressor and insert a 30A fuse into the holder. Now route the wires down to the area near the horn connector. Be careful to keep the wires away from especially Hot areas of the engine compartment, zip tie where needed to keep them away from moving parts. Its a good idea to connect the hose to the compressor and route it with the wires.
5. Now cut off any slack from the hose and connect it to the horn.
6. Next size up the wires to the horn connector and cut off any excess.
Use the quiksnap connectors to splice the wires together (On my car it went Black-Black, and Red-Orange/Green). Zip tie up the horn connector and wires out of the way, and away from hot/moving parts.
And that should be it! With this installation method, the horn will work with your normal horn switch inside of your steering wheel. Go ahead and give it a try!
If it doesnt work for any reason, check the connectors to the rear of the compressor and at the horn connector.
7. Have fun! Hope this was informative... Please post any questions/comments!
PS-Here is another pic of the horns mounting location. Fit perfectly!
![Image]()
I picked up an air horn from someone on craigslist for $10 the other day, and decided to try and install it. My stock horn was removed some time ago, so I figured it would be better than nothing! You can normally find these types of air horns for $20-$50+, just depends on how loud you want.
Here are the materials needed for this installation:
-Air Horn kit. a good place to go is harbor freight tools, autozone, checker, etc..JC whitney is also a good place.
-30 amp or higher inline fuse holder

-i used two of these "Quiksnap" connectors, because you can retain the stock horn connector in case you ever want to go back the stock setup

-Zip Ties. The more the merrier!

-2 female spade connectors

-2 horn mounting brackets. one should be on the stock horn, one can be had at auto parts stores, junk yards, etc. you can always fab one as well.

-Hardware: I needed two nut/bolt pairs one for horn to bracket, one for bracket to frame.. its always good to have a couple of extras and some washers, etc..

ok, so to start off with, you will want to assemble your cables. For the power (red+) cable, assemble it in this order:
Spade conn=inline fuse holder w/30A fuse=wire (14g is good)
Negative cable (black -)
Spade=wire (14g)
Now you want both of these to be around 3 feet total in length so you have plenty of slack to reach the horn connector.
You will also want about 3 feet of hose (i used 5/16 ID clear plastic hose purchased @ lowes, but usually the horn kit will have some with it).
So now that you have everything purchased that you will need, we can start the installation. This will be much easier if you have the car up on jackstands or on a lift. *NEVER* leave the car jacked up and crawl under it without jackstands!
1. Unplug and remove the stock horn unit, and remove the mounting bracket.
2. Next, shape the horn mounting bracket as needed to accomodate the larger air horn. You will need to find somewhere to mout the horn under the car. You can see where I mounted mine HERE:

This is the view from underneath the drivers side of the vehicle. The horns trumpets point forwards towards the lower grill, beside the radiator/condenser.
3. Now that you have the horn mounted, its time to mount the compressor. I mounted mine using an extra horn bracket that i had. It is mounted high in the engine compartment, near the battery. This way its up away from splashes and debris. I used the upper headlight screw to attach the bracket to.


4.Next you will connect the two wires to the corresponding connectors on the bottom of the compressor and insert a 30A fuse into the holder. Now route the wires down to the area near the horn connector. Be careful to keep the wires away from especially Hot areas of the engine compartment, zip tie where needed to keep them away from moving parts. Its a good idea to connect the hose to the compressor and route it with the wires.
5. Now cut off any slack from the hose and connect it to the horn.
6. Next size up the wires to the horn connector and cut off any excess.
Use the quiksnap connectors to splice the wires together (On my car it went Black-Black, and Red-Orange/Green). Zip tie up the horn connector and wires out of the way, and away from hot/moving parts.
And that should be it! With this installation method, the horn will work with your normal horn switch inside of your steering wheel. Go ahead and give it a try!
If it doesnt work for any reason, check the connectors to the rear of the compressor and at the horn connector.
7. Have fun! Hope this was informative... Please post any questions/comments!
PS-Here is another pic of the horns mounting location. Fit perfectly!

")